Add a Staff/Calendar
- Click on Manage in the top menu.
- Click on Staff/Calendars.
- Click the
 button.
- Complete the Name field. This could be a person's name or a name for the resource booked by your clients. (e.g. Rebecca Smith, Meeting Room 4, or Whatever Class).
- Optionally, add notification Email Recipient(s), a Description, or a Photo.
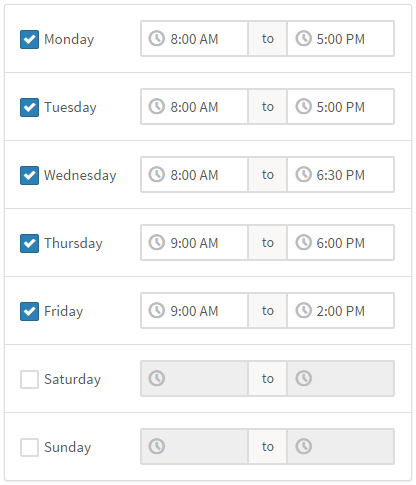
- Then, click the Schedule tab. Enter the Appointment Hours (standard schedule) for this calendar and uncheck days that it is never available. This will set the default times someone can book an appointment with this provider and overrides the business hours setting. Appointments and busy times will be factored into actual availability. Availability can be customized on specific dates by modifying the Roster.
- Scheduling Mode allows you to control how available appointment start times will be displayed to clients on the booking module. Automatic mode determines available times automatically, based on your existing schedule and settings (recommended). Manual mode only allows times that have been manually added to be available for scheduling, and only if they are within this calendar's Appointment Hours. For detailed steps on how to enable Manual mode, see Manually Set Appointment Times.
- If this staff/calendar needs to be able to schedule more than one appointment in a given time slot (Overlapping Appointments), click the Advanced tab. Check the Allowed checkbox to enable overlapping appointments for this staff/calendar. If Overlapping Appointments are allowed, multiple appointments can be scheduled during the same time slot. Set the Limit to determine the maximum number of appointments allowed during a time slot (to allow overlapping, the Limit must be greater than 1).
- Finally, click Save.